Thursday, March 31, 2011

Easter Basket Candy

Easter is right around the corner and it is one of my favorite times of the year for making little treats to share with others. My mom got this idea out of a magazine many years ago and we have been making them ever since then. They are always a hit with the little ones!

Easter Basket Candy

You need just a few simple ingredients:

Mini peanut butter cups
Chocolate covered round pretzels (or you could use regular round pretzels, black string licorice, etc..)
Green frosting (store bought or homemade)
Egg shaped candy or sprinkles

Peanut butter cups, round pretzels and frosting


egg shaped candy and sprinkles
A special grass tip for frosting (#233) is extremely helpful, but not necessary!

wilton tip #233
Unwrap the peanut butter cups and cut the bottom third off from the pretzels to form the handle.

cut pretzel for handle
Pipe or spread the frosting onto the peanut butter cup.


Add your candy eggs or sprinkles


Top with the handles and you are done!


I love to package these up in egg cartons and add a tag for easy transportation and gift giving.

Tuesday, March 29, 2011

More Crepe Paper Roses

A couple of people have asked me how to add stems to the crepe paper roses for bouquets.  I tried adding wire after the roses were made, but it was hard to get the wires to hold on and not slip off.  I found the best way was to wrap a wire or chenille stem into the center of each rose.
Crepe Paper rose with stem

 The roses are made exactly the same way as previously shown, you just add a piece of wire into the center of the flower before you begin wrapping.
Add wire or stem to end of crepe paper (bend end for a little more hold)


Begin wrapping crepe paper around stem

Continue Wrapping

Final wrap

Now your crepe paper roses are ready for use in :
Bouquets

Pew bows or chair decorations


Use in vases or centerpieces


Napkin rings

candle rings or decorations


These would also be great to use in hair pieces or on garland!


Monday, March 28, 2011

Cinnamon Graham Crackers

These are one of our favorite treats in the summer!  Spread them with a little peanut butter or frosting or use them for some delicious ice cream sandwiches. Yum!


1 1/2 C. whole wheat flour (I used a combination of freshly ground whole wheat and spelt flours )
1/2 C. wheat germ
1 C. unbleached flour
1 tsp. cinnamon
1 tsp. baking soda
1 tsp. baking powder
1/2 C. butter or margarine, softened (you could also substitute shortening)
1/2 C. brown sugar (I didn't want to make brown sugar so I used evaporated cane sugar)
1/2 C. honey
1 tsp. vanilla extract
1/2 C. milk
cinnamon/sugar


Sift together flours, wheat germ, cinnamon, baking soda and baking powder.

 In mixer, cream together butter and sugar.

Add in honey and vanilla.  (Hint: spritz your measuring cup with nonstick spray before measuring your honey and it will slide right out!)

Mix in sifted ingredients alternating with milk to form dough.  Dough will be slightly sticky.  Wrap dough in plastic wrap and refrigerate for at least 2 hours.
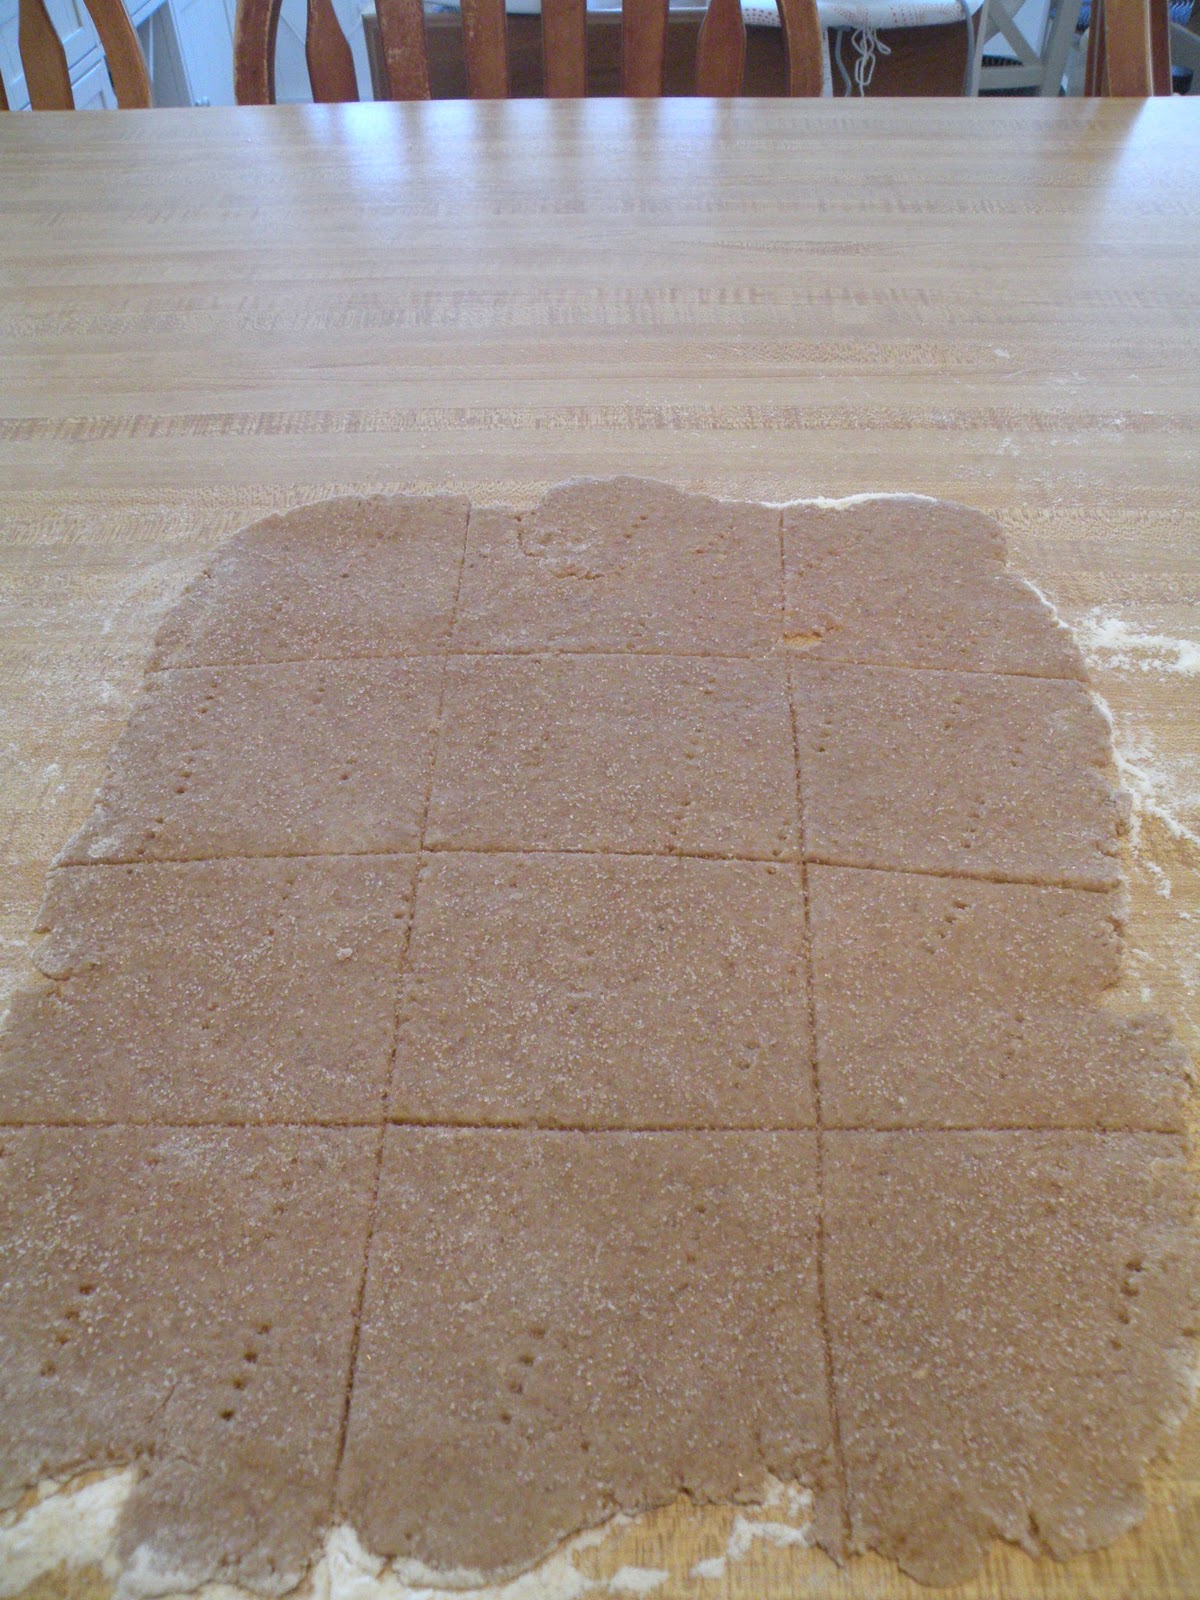
Divide dough into quarters and roll into a rectangle on a lightly floured surface using a floured rolling pin.
Using a pizza cutter, cut dough into squares. Prick several times with a fork and sprinkle with cinnamon/sugar mix. 

 Transfer to cookie sheet and bake in 350 degree oven for 10-12 minutes or until lightly browned. Remove from sheet and cool.

-Use these crackers to make a graham cracker pie crust.

-If you don't have wheat germ, substitute another 1/2 C. whole wheat flour.

-For chocolate graham crackers, substitute cocoa powder for the wheat germ.

-For plain crackers, leave out the cinnamon and don't sprinkle with cinnamon/sugar.

-These make awesome s'mores!

Saturday, March 26, 2011

My House as a Sanctuary

Boy, things have been crazy around here lately.  I realized today that it has been almost 2 weeks since I have posted anything--yet it feels like just a couple of days. So here is a quick peek at what we have been doing.

Our back room flooded with all the thawing and snow melt and we spent days trying to keep the water level down.  One night more dear husband had to empty the shop vac every 5-15 minutes all night long to keep up.  This room is our main storage area (we don't have a garage or an actual basement) but fortunately we did lose too much.  This biggest hassle is the drywall is all moldy and will have to be removed, but we have to wait until it is warm and dry enough to haul everything outside.  Hopefully we won't discover any new surprises.

The other big project we have been working on is remodeling our main bath.  The tub quit draining last fall and despite repeated attempts to clear the drain, it just wouldn't drain.  A plumber has not been in the budget, so we have been limited to using the shower in the downstairs "dungeon" bathroom (aptly named because it is very cold and dark!).  My husband finally got brave and cut the pipe that goes into the sewer and discovered it was completely blocked with sludge, hair and a couple of razor blades (major yuck!). 
The tub that was in the bathroom was really old, narrow and shallow (it's not a bath if you can't even cover your knee caps in water!), so we have been saving up for months now to replace the tub. 
Getting the old tub out was quite a chore, it was porcelain covered cast iron and weighed A LOT!  The bathroom is now totally gutted and ready for re-construction.
The opening for the new deeper and wider bathtub
View from hallway
I only wish I had remembered to take pictures before we started ripping the bath apart. 

We also ripped up the ceramic tile on our landing because it was cracked and damaged and the water was leaking through.  We were sad to see that they had installed the ceramic tile directly on top of the hardwood floor damaging the floor.  We are going to install some flooring that we found at Home Depot that is supposed to be waterproof and has a 25 year warranty.  Hopefully it is as quick and easy as they claim.

View of landing
Along with all the house projects I have been busy with planning parties, working on projects for the parties (hopefully I will have some completed projects to share soon!), trying to plan a vacation, writing a new ebook, fighting a head cold, and trying to keep up with my kids and my dear husband.


When I start to feel overwhelmed or frustrated with all the projects around the house (especially when they aren't going the way I want or seem more difficult than they should be) I am reminded that when we bought this house we committed to using this house as a sanctuary for anyone who needed it and to serve God in whatever way He chose for us.  We are in a preparation phase and even though I am not quite sure what God has in store for us, I know that He has a plan and the work we are doing now is going to allow us to use this house for His glory soon! 


“And you, my son Solomon, acknowledge the God of your father, and serve him with wholehearted devotion and with a willing mind, for the LORD searches every heart and understands every desire and every thought. If you seek him, he will be found by you; but if you forsake him, he will reject you forever. Consider now, for the LORD has chosen you to build a house as the sanctuary. Be strong and do the work.” 
1 Chronicles 28:9-10


Saturday, March 12, 2011

Baked Caramel French Toast w/ variations

Keep one in the freezer for an easy weekend brunch!


Baked Caramel French Toast w/variations

1 loaf french bread (or any bread you like)
8 eggs
3 C. milk (you can use half & half, cream and milk to equal 3 cups or any non-dairy milk)
1 Tbsp. vanilla
2 tsp. cinnamon
1/2 tsp. nutmeg

Topping

1 stick butter or margarine, melted
1 C. brown sugar

Cut bread into slices.
Layer bread slices in pan.  (I am using round pans so I tore my bread into smaller pieces).

Mix eggs, milk, vanilla, cinnamon and nutmeg in a bowl.

Pour egg mixture evenly over bread.

Mix topping together and drizzle over bread.
To Bake now:  Preheat oven to 350 degrees and bake for 40 -45 minutes until browned and center is set.

To Freeze:  Cover with plastic wrap and place in freezer bag.  Thaw before baking and follow baking instructions above.

Variations:

~ Add chopped apples and pecans for a caramel apple french toast.

~Leave the caramel topping off and add  fresh or frozen blueberries. Sprinkle with powdered sugar.

~Leave the caramel topping off and add dried cranberries and chopped pecans (my favorite!) with just a dusting of powdered sugar.

~Add 1/4 C. spiced rum or Irish whiskey to the milk mixture (be sure to still equal 3 cups) for a grown-up treat.

~Substitute 1 C. of milk for canned pumpkin and substitute the cinnamon with pumpkin pie spice for a fall flavor.

Friday, March 11, 2011

On the hardest day of your life go to the deepest thing you know about God and hang on

What I know about God:

~I know God is good

~I know God is faithful

~I know God is sovereign

~Nothing catches God off guard

~Jesus Christ lives in me

~My sins are forgiven

~I know for certain I am going to heaven

~He never makes a mistake

~God loves me unconditionally

~God uses everything that touches my life for my good

~God uses everything that touches my life to accomplish His purpose

~God's grace is totally sufficient

~God's plans for me are for my welfare

~God's will for me is good, perfect and acceptable

~God heals

~God delivers

~God sets the captives free

~God gives joy in the midst of adversity

~God will see me through this storm

~God will provide my every need

~I don't have to carry my burdens alone with the fear of anxiety or worry

~I don't have to live in fear of the future

~I don't have to live in the shame of my past failures

This is taken from the movie Flame On a true story of a family that loses a child. I am touched by this family's faith in the midst of their tragedy.


(For many (especially those in Japan) today is the hardest day they have ever faced! I pray that they can find Jesus and hang on. We never know how we will react when we are faced with tragedy, but I pray I will hold fast to the these truths about God!)


.

Fast and Easy Donut Holes

These are the fastest and easiest donut holes to make!

You will need:

A can of biscuits!
 Yep, a can of buttermilk biscuits. 

Open biscuits and cut each biscuit into quarters.


Deep fry biscuits in 350 degree oil until golden brown on all sides (this only takes about a minute!).
Drain on paper towels.  Roll still warm donuts in powdered sugar or cinnamon/sugar mixture.
Serve and Enjoy!


~When my kids were little the park that we went to was near a donut shop and it was not uncommon for the moms to stop and get there kids a little treat.  At the time we had 3 small children and 1 smaller income and even the $.49 (for 3) donut holes were often not in our budget.  The canned biscuits would often go on sale for $.15 to $.20 a piece, so I would pick them up when they were on sale and keep them around for when I wanted to treat my kids and not break the bank.  The other moms thought they were getting a bargain at 12 donut holes for a $1----little did they know I was making 40 for about $.25!

Thursday, March 10, 2011

Just Add Glue..........


A couple of weeks ago I was wandering around in a little local "junk" shoppe and came across this great old wooden window frame.  I have always loved the look of old windows and the price was right, so I picked it up.  It has been sitting around just waiting for me to get inspired and do something with it.  This is what I finally decided on:
I love the fact that I can change out the wreaths for the season ( I am already in Easter mode) and even the letters for special occasions!

I forgot to take a "before" picture, but the frame was a weathered gray color.  I wanted to dress it up to match my room but keep the vintage appearance.  I love the appearance of crackle paint, but honestly I was too cheap to go out and buy some for one project.  I remembered back in elementary school our art teacher (we had an amazing artist as our art teacher, we even got to make pottery in his studio!) taught us to make things look old with a common school supply--so after a little experimenting I got just the look I wanted.
Close up of frame

Shhhh....here is the secret:
Yep, that is plain ole school glue!  You can pick this stuff for a quarter at back-to-school sales.  I always buy a few bottles to have around the house for projects.

To get a crackle finish, basecoat your project in desired color.
Squeeze glue out on your project.  If you have a big project, you might want to work in smaller sections.
 
Use a brush to spread glue out covering your desired area.

Allow glue to set for a minute or two.  You want the glue to still be tacky.  Paint your top color over the glue. I used inexpensive acrylic craft paint.


Let project dry.  You can speed the drying with a hair dryer or heat gun, just don't get too close or you will end up with bubbles in your paint.

I got a different crackle pattern on this sample.  I think it has to do with the kind of wood and how you brush on your glue.  Experiment on a scrap piece of wood or an inconspicuous corner of your project.  You can paint over the crackle paint if you are not satisfied.

Now you can get an "old" looking piece in a matter of minutes without breaking the bank!

If you are using this finish on a piece of furniture I would seal it with a spray sealer or polyurethane to help protect the finish.